Goodbye Olive Chicken, we hardly knew you

The demolition of the site formerly known as Olive Chicken is now complete.  This is a prime commercial site on a very large commercially zoned lot, measuring approximately 125 ft x 100 ft in depth, with a very large amount of frontage onto 17 ave.

Commercial / Multi Family Project (BP2017-15843) is Hold. Permit created on 2017-12-04.

It also appears that an application has been filed for a multi-family project with commercial use on the lower level.  I will attempt to preview the drawings and offer some commentary on what is planned.  What I can say right now, is that a tired old chicken shack on a huge lot surrounded by parking and tumbleweeds will not be missed.  It is time the valuable land in these areas are developed with the needs of 1.25 million residents in mind.  So thumbs up to whomever is tackling this project and investing significantly to make our City better!

Looks like it sold recently as well for a significant sum.  The buyer must be very serious about getting started.

                       REGISTERED OWNER(S)
REGISTRATION    DATE(DMY)  DOCUMENT TYPE      VALUE           CONSIDERATION
--------------------------------------------------------------------------------

171 176 651    09/08/2017  TRANSFER OF LAND   $2,500,000 
Now that the site is demolished, I'd challenge anyone to remember what was there previously without consulting google maps.  What this site needs is a landmark mixed use project that will draw new residents and businesses to the area.

Now that the site is demolished, I'd challenge anyone to remember what was there previously without consulting google maps.  What this site needs is a landmark mixed use project that will draw new residents and businesses to the area.

Rowhouse plumbing - much jack hammering needed

the plumber was on site today and we tackled the dreaded task of hammering through the frozen solid ancient river sediments.  Many existential questions were asked, such as, why am I doing this, don’t I have a dozen more urgent concerns than jacking this hideously tough rock?   At least we are making progress.  I need these basements done, and poured.  Soon. 


IMAGE.JPG

a lot of hard work is invested in making these basements drain properly.   This needs to last decades with little to no maintenance. 

The second basement gets its plumbing rough-in.  Contrast the amount of excavation required vs the downstream basement.  Three hours and it is basically done.

The second basement gets its plumbing rough-in.  Contrast the amount of excavation required vs the downstream basement.  Three hours and it is basically done.

Construction screwups. Learning from somebody else

Construction screwups happen to everyone and normally the cause is someone not taking five minutes to read the instructions. This can lead to some awful problems with no apparent solutions. 

Once evident, the screwup then leads to the blame game where everyone points at someone else and the builder points at whomever is closest.   

The trades and suppliers are experienced at these affairs and like to redirect the responsibility upwards toward the builder.  They do this by having the builder sign off on shop drawings.  This means that the builder has to take responsibility (in theory) for endorsing mistakes in the drawing that the supplier produced.   

Once the mistake is encountered the supplier can avoid responsibility for their own negligent design work by saying the builder agreed to it (as if anyone would knowingly agree to purchase a product with a design flaw).  The problem this 'sign away responsibility condition in the contract' is the builder hired the designer for the accuracy of the drawing and for their ability to follow instructions.     

In this instance the fancy oversized and built in fridge requires a trim kit to fit properly in the kitchen.  Because the builder and designer were negligent in following the instructions (i.e did not read them) the cabinets were made wrong and fixing them is now almost impossible (unless cabinets can stretch).  I was called in as the known instructions reading paranoid person and the mistakes were quickly identified.  Solutions are all invasive and will take serious time and effort (money) to implement.  I'm not sure what will be done to deal with the situation.     


IMAGE.JPG

the double fridge doesn’t fit within the cabinetry properly, what do do?  I’ve learned a lot about what to do and not to do that will make my life a lot easier in the future as I have a project coming up and intend to specify this fridge.     

Metal siding part 2

the siding contractor was able to take advantage of the mild winter conditions and install a few of the metal siding faces on the building.   We’ve all learned a lot about the capabilities and challenges of the system.  Looks great overall.  


IMAGE.JPG

Finishing starts - semi detached project

We’ve now arrived at the finishing part of the project at about day 110 of the build.  Walls are primed and the ceilings textured, and the door and trim material is ready on site. I have the schedule adjusted to the completion of cabinetry and paint and will be finalizing the remainder of the flooring and tile deliveries.  While a lot of work has been completed, much remains as we approach the fourth month anniversary of the site work.   


IMAGE.JPG

A lot of white all the way up to the skylight in the stairwell.  

IMAGE.JPG

material is stacked inside ready for our next contractor to start.  

Sewer install - inner city

My contractor arrived to start the install of storm water, sewer and treated water.   This will require two destructive trenches into the city street and and the prepayment of a big fee (done months ago).   


IMAGE.JPG

Water shut offs means the water is ready to go.  


IMAGE.JPG

The sewer connection point is a long way away so the trench extends across the road.  

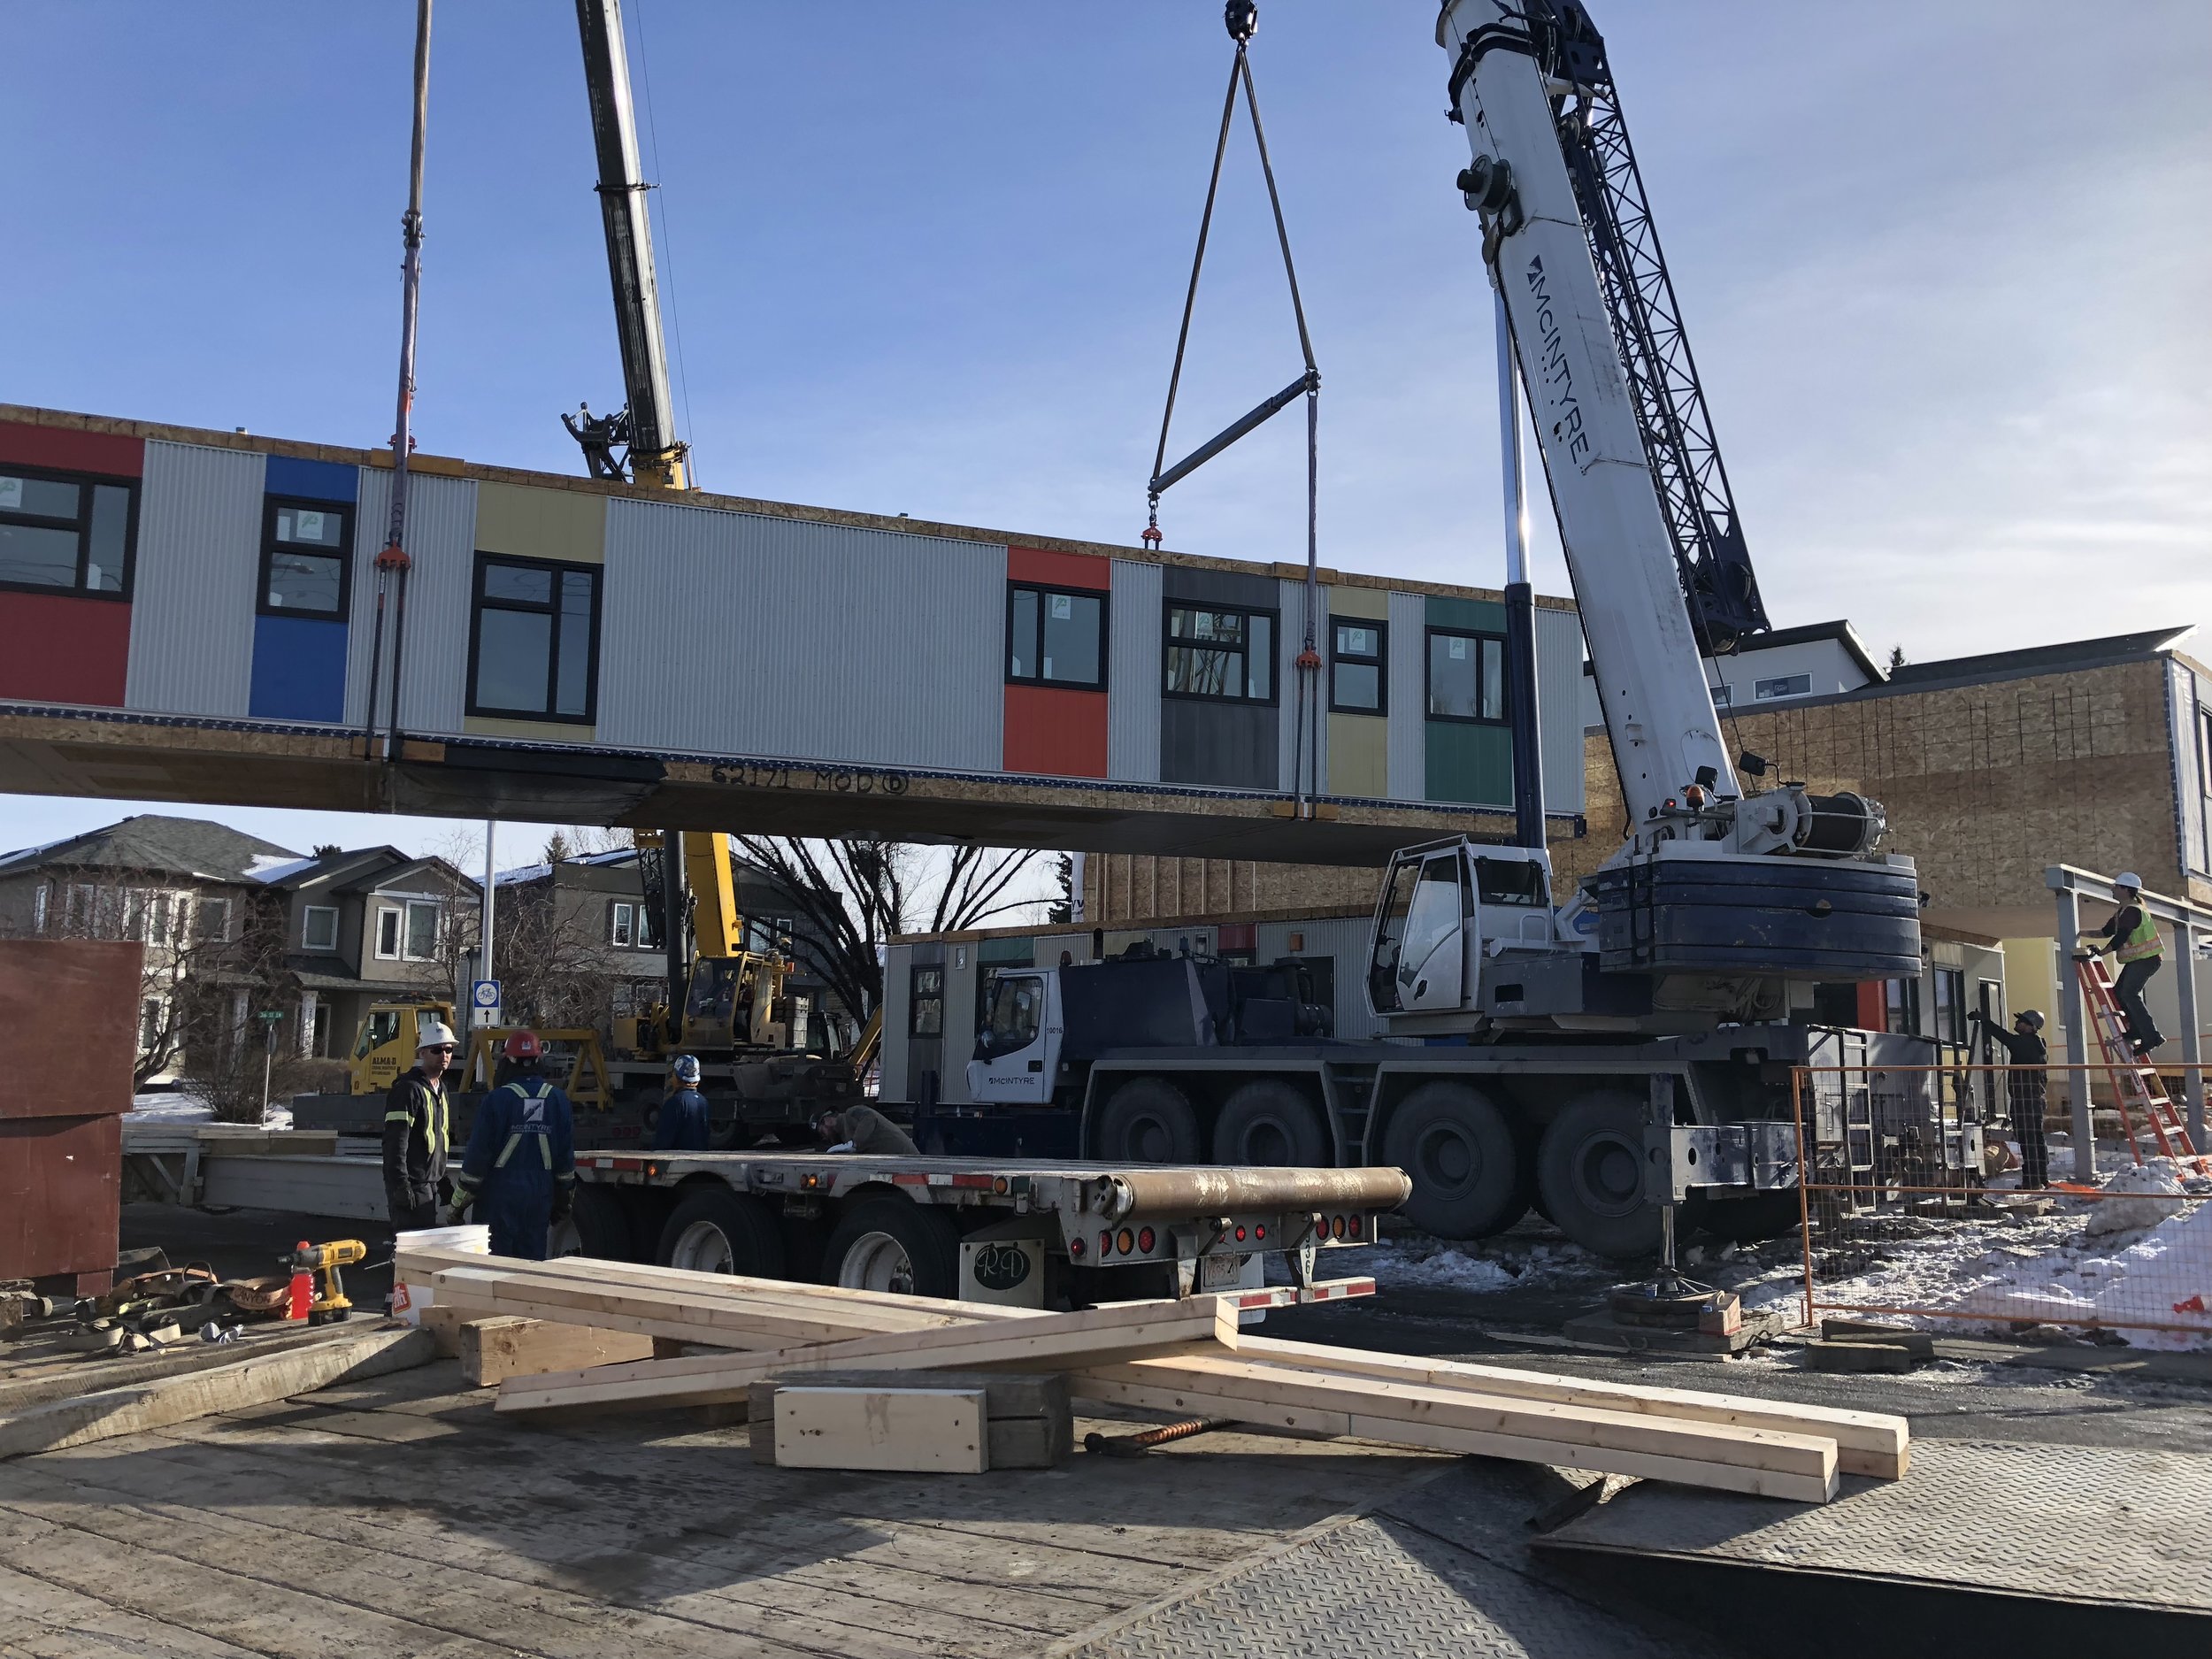
Killarney modular daycare is assembled

In unrelated Killarney news, a daycare operation is going ahead using modular construction techniques.  This is really interesting and looks well executed.   

Im now reminiscing about my old modular building days up north.  Maybe I can dig up an old photo of that project and post it here.


IMAGE.JPG

Soon to be a happy place filled with lots of kids.  For now the cranes are lifting the last of it into position.  

Sewer and water install prep

The decision was made to proceed with the sewer install during the winter season. Unfortunately the deep frost and overall difficult conditions add a lot of cost to the already expensive install.  With heavy machinery arriving on site we’ve removed two very full dumpster bins and cleaned the front yard so the crew can work tomorrow.   


IMAGE.JPG

The huge bucket is useful for scraping the street.   


IMAGE.JPG

Another load of drywall scrap is removed from the front and placed in the new bin. Sewer install prep is complete.  

Level 5 ceiling at the semi d project

The tapers were back to tackle the flat ceiling on the main floor. Once taped and sanded a heavy primer is applied to the ceiling to create the flat look we are after.  


IMAGE.JPG

Jiggi and jp are some of the best tapers in the city.  They’ve been tasked with finishing the flat ceiling.   

Rowhouse framing part 6 - the roof

With exceptional weather this week the crew is setting up the majority of the trusses.  Once again I am grateful to the framing crew for overcoming some terrible cold and for having the lifting machine that adds so much to their productivity.

With the roof advanced this far we now have to deal with the last of the firewall pours.  The framers set up a series of planks to allow the cribbers very easy access to set the last of the forms.  With some luck we can have this done quickly and the roof can be finished completely.  

All the heavy sheeted gable trusses are quickly lifted into place and fastened.  With framers on the ground assembling the pieces, and one on the roof installing the trusses, progress is made.

All the heavy sheeted gable trusses are quickly lifted into place and fastened.  With framers on the ground assembling the pieces, and one on the roof installing the trusses, progress is made.

The first of three roofs is complete.  

The first of three roofs is complete.  

Inner city design ripoffs

One of my construction frenemies likes to follow my projects around and ripoff the best ideas.  I can't say I am completely innocent of the same strategy, however I am a little less overt in the execution.  

This is the same builder that reneged on a land deal we had agreed to previously so I was already a little aggravated with him.  So I didn't get the land, and he stole my designs.  Bad deal!

Fourplex built in 2013.  Original creative work.

Fourplex built in 2013.  Original creative work.

Fourplex under construction 2018 - copied design work.

Fourplex under construction 2018 - copied design work.

Making Changes - deviating from the plan

Making changes to the framing during the process is another of my construction peeves.  The plans should be perfected before work begins such that changes are not necessary.  

Practically speaking, once the building starts to take shape, it always looks different than the preconceived notions of the builder.  To the client, who'd generally be much less versed in the translation from computer screen to framing than a builder, the actual framed project could be a disappointment.  More often it goes the other way, the framed building looks better than the client had expected on paper, but for sure we make errors.  How to react to the decision to make changes is key.  

1.  make the decision as early as possible - it is a lot easier to make framing changes before the framers have left the site.  Don't leave it until wiring, plumbing, etc are in.  That would compound the error and add cost.  

2. draw out the change precisely - by drawing it on a page or screen, at least unintended consequences can be considered before new work is ordered to execute a change.

3.  don't be afraid to change it twice - if the first change is not good, revert back to the original, or do something different.  You only get to build a house once, so better to spend a little extra time and money to make the layout as good as possible. 

I am the builder and the client on the rowhouse - so I can make changes by consulting myself, this is the best scenario.  Indecisiveness is likely worse, because the decision will drag on indefinitely.

Now that the framing is done enough to get a good feel for it, it didn't feel right.  Changes will be made according to the red ink.  The challenge with building a new plan is it may not be as good in three dimensions as it appeared on the…

Now that the framing is done enough to get a good feel for it, it didn't feel right.  Changes will be made according to the red ink.  The challenge with building a new plan is it may not be as good in three dimensions as it appeared on the computer screen months earlier.  With three units, all three will be changed, fortunately only one of the three was very far along.  I will learn some lessons here and apply it next time.  Learning the hard way is usually the best way in construction, the school where everything you do wrong is the tuition cost.

Rowhouse framing part 5 - stairs

this is the time of year when everyone should have a lot of extra sympathy for outdoor workers.  A few days this week were too cold for the framers to work, but some effort was made and the stairs were produced and delivered.  Next week the forecast is very good so expect a big push to get the roof on.  

IMAGE.JPG

this always makes site access a lot more convenient (once installed rather than piled in the snow)  


IMAGE.JPG

and in they go.  The temporary set is in the background and no longer needed once all four pieces are hung.   

We bought a house

Circumstances came together unexpectedly and I was able to close a deal on another house with two venture partners. 

In my experience it is more fun finding and buying houses than it is investing six months of constant effort to get them built properly. However, this is an exciting project and I’m going to make the build as fun as possible.

The lot is a different type of semi detached property as it is laneless. This offers both the positives and negatives of a front garage. Watch this page and, when the dp is approved, I will post many of the project details.  I don’t see a lot of attached garage projects in my building career ahead so we’ve got to make the best of this one.  


IMG_0792.JPG

here is the new site.  We are super keen on this location and the build.   

Drywall begins - Pace of construction comparison

With drywall underway, we are now moving into the finishing stage of the project, always a happy milestone.  The interesting comparison to make here is the time lost vs the last project from inspections to starting drywall.  Unfortunately we have now lost much of the time advantage over a previous build.  The weather, holiday season, and some permit delay cost us almost two weeks.

Previous project inspection to drywall - 5 days

Current project inspection to drywall - 22 days.  

While extremely frustrating to lose so much time (a lot of it between dec 20 and Jan 5th), the current project is still ahead of the previous project.  

Previous project footing to drywall - 104 days

Current project footing to drywall - 96 days.

So the pace of construction has now narrowed, unfortunately if we had been a little quicker and luckier the drywall would have been complete before Christmas.

Drywall going on the ceiling, a lot of work has gone into the project to date, 96 days to get here.

Drywall going on the ceiling, a lot of work has gone into the project to date, 96 days to get here.

Overcoming winter

Farmer fixes and natural gas distribution, not two items commonly associated together.  At minus 20 celsius, the builder needs to get creative when it comes to heating up the sites.  Further complicating the matter is a gas main in the alley too short to connect gas to both of the houses without a gas main extension, and even an absence of a gas meter on the second house.

Work arounds included rental of a 75 ft x 1 inch natural gas hose and purchasing uncommon flared 1 inch fittings, making use of the T at the meter and running the gas hose from the first meter into the second furnace, and hooking it all up.  This immediately allowed us, along with help from the mechanical contractor, to fire up both furnaces.   

With insulation done, drywall delivered, and crews ready to start we faced a second challenge, lack of disposal of furnace condensate.  When heating up a house the furnace combustion byproduct is water, and lots of it. The floor drain can't be used as we don't currently have the sewer hooked up, so without some solution, the water coming out of the furnace would flood the basement floor. That could be 5 gallons over a 24 hour period.

Another farmer fix was then deployed to deal with the condensate, a laundry basket.  5 gallon pails are too tall, especially given the low condensate pipe on the furnaces.

The final farmer fix for the day is emptying the condensate into a laundry basket and tossing it out the basement window.  Until the sewer is connected, there is no way to manage the large volume of condensate.

The final farmer fix for the day is emptying the condensate into a laundry basket and tossing it out the basement window.  Until the sewer is connected, there is no way to manage the large volume of condensate.

Rowhouse framing part 4

Framing progress to date includes the top floor interior walls and trusses now going on. With the changing weather it looks like the truss project will slow.   Layout gets the thumbs up from the builder for the two bed two bath plus loft and laundry arrangement.   


IMAGE.JPG

The first of many trusses are Installed.  

Metal siding part 1

We are working with a new siding product.   So far it isn’t going on as nice or easy as we had hoped.   Typical of new product, it looks better in the sales brochure than when it hits the site and needs to be put on the wall.  Despite the difficulty in getting it on, the product look is exceptional.    


IMAGE.JPG

Nothing compares to the metallic luster of metallic product.   The corner trims are fastened last to complete the look.  

The monster firewall continued...

The rowhouse framing project is moving again now that the new year arrived with extremely mild weather.  The second floor firewall was set up and poured by the cribbers yesterday, and the forms are coming down now.  What we are left with is another 10 ft section of wall (total of 30 ft), but it is still too short to be as high as we need.  So yet another pour will be necessary, this time it will mimimc the shape of our roof trusses plus 6 inches, however that ends up.  

Mild conditions allowed for another pour without additional tarping or heating.  The wall itself is a barrier to movement within the building for those building it, quite a pain as well to deal with.  

Mild conditions allowed for another pour without additional tarping or heating.  The wall itself is a barrier to movement within the building for those building it, quite a pain as well to deal with.  

IMAGE.JPG

This is the look of the massive concrete firewall once it was stripped. Second floor walls are progressing nicely.